GitHub |
您所在的位置:网站首页 › git match › GitHub |
GitHub
|
Match 3 SDK
A cross-platform library that makes it easy to create your own Match 3 game.
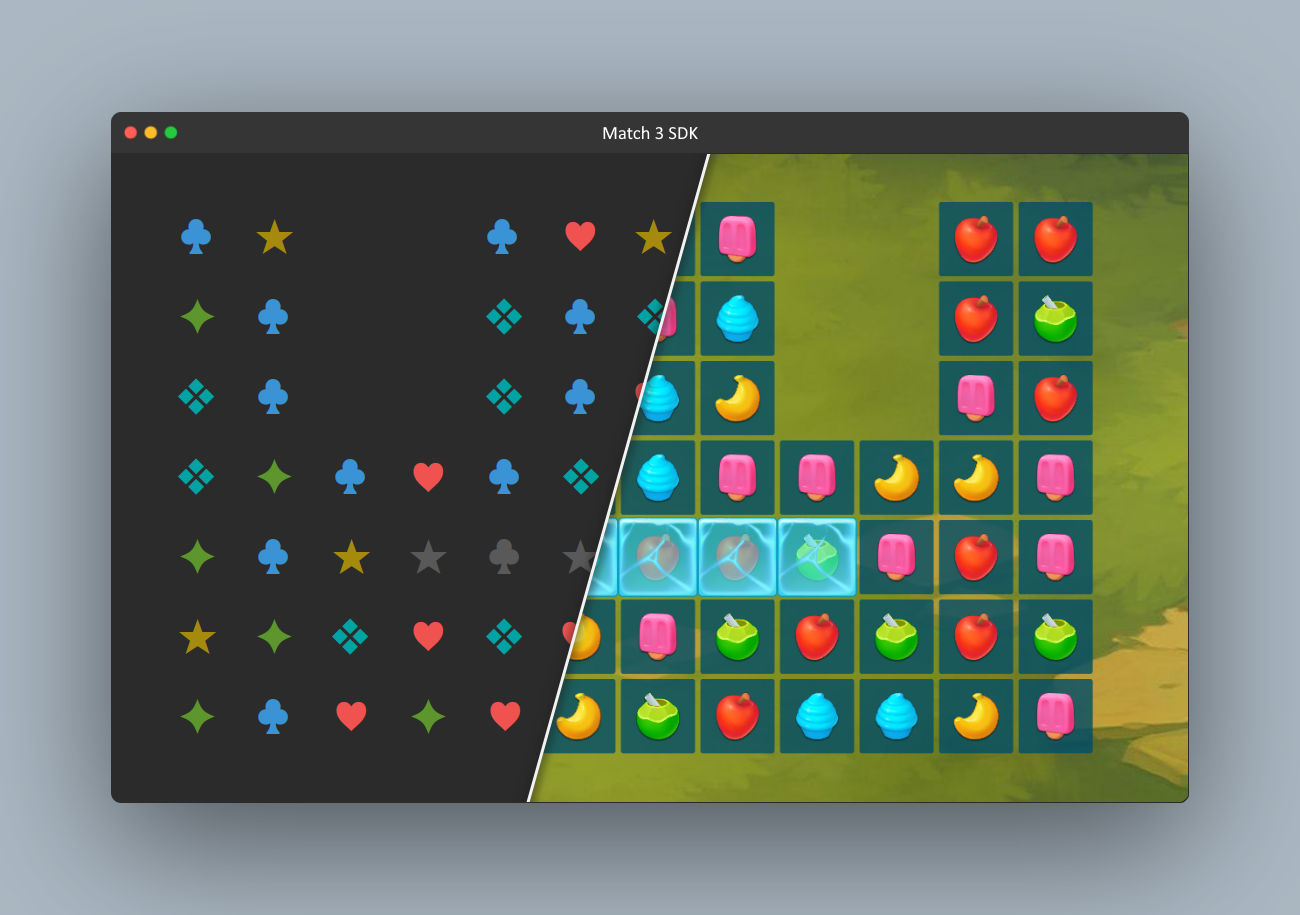
The Match 3 SDK is designed to speed up the development of Match 3 games. Use the samples as a starting point for creating your own Match 3 game. Unity sampleA Match 3 game sample with three implementations to fill the playing field. Simple Fill Strategy Fall Down Fill Strategy Slide Down Fill Strategy


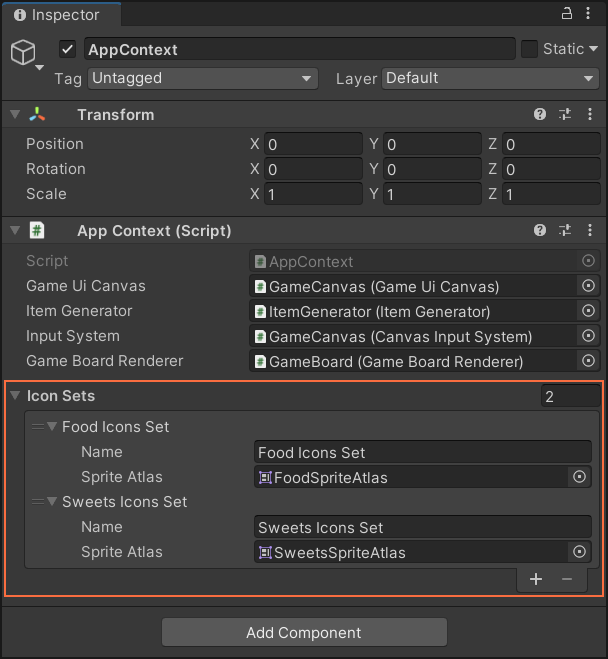
Note: The FallDownFillStrategy & SlideDownFillStrategy are given as an example. Consider to implement an object pooling technique for the ItemMoveData to reduce memory pressure. Gameplay Demonstration UnityMatch3Gameplay.mp4 Terminal sampleA Match 3 game sample designed for text terminals. Gameplay Demonstration TerminalMatch3Gameplay.mp4Note: The sample was tested using Rider's internal console. If you have a problem displaying symbols, configure your terminal to support Unicode (in UTF-8 form). For Windows, you can use the new Windows Terminal. 🌵 Folder Structure . ├── samples │ ├── Terminal.Match3 │ └── Unity.Match3 │ ├── src │ ├── Match3.App │ ├── Match3.Core │ ├── Match3.Template │ └── Match3.UnityPackage # Auto-generated │ ├── Match3.sln ⚙️ InstallationDependencies: Match3-SDK: UniTask Unity Match3-SDK: UniTask Unity Match3-Sample: UniTask, DOTween & Match3-SDKYou can install Match3-SDK in one of the following ways: 1. Install via Package ManagerThe package is available on the OpenUPM. Open Edit/Project Settings/Package Manager Add a new Scoped Registry (or edit the existing OpenUPM entry) Name package.openupm.com URL https://package.openupm.com Scope(s) com.cysharp.unitask com.chebanovdd.match3sdkOpen Window/Package Manager Select My Registries Install UniTask and Match3-SDK packages 2. Install via Git URLYou can add https://github.com/ChebanovDD/Match3-SDK.git?path=src/Match3.UnityPackage/Assets/Plugins/Match3 to the Package Manager. If you want to set a target version, Match3-SDK uses the v*.*.* release tag, so you can specify a version like #v0.1.2. For example https://github.com/ChebanovDD/Match3-SDK.git?path=src/Match3.UnityPackage/Assets/Plugins/Match3#v0.1.2. Note: Dependencies must be installed before installing the package. Releases Page Match3.SDK.zip - to use the Match3-SDK outside of Unity (eg. just as a normal C# project) Match3.Unity.SDK.unitypackage - contains Match3-SDK source code Match3.Unity.Sample.unitypackage - contains the sample project for Unity com.chebanovdd.match3sdk-*.tgz - for installing the Match3-SDK from a local tarball fileNote: Dependencies must be installed before installing the packages. 🚀 How To Use Add new icons setTo add a new icons set, simply create a SpriteAtlas and add it to the AppContext via the Inspector.
Note: You can change icons size by changing the Pixels Per Unit option in the sprite settings. Create animation jobLet's create a SlideIn animation to show the items and a SlideOut animation to hide the items. These animations will be used further. Сreate a class ItemsSlideOutJob and inherit from the Job. public class ItemsSlideOutJob : Job { private const float FadeDuration = 0.15f; private const float SlideDuration = 0.2f; private readonly IEnumerable _items; public ItemsSlideOutJob(IEnumerable items, int executionOrder = 0) : base(executionOrder) { _items = items; // Items to animate. } public override async UniTask ExecuteAsync(CancellationToken cancellationToken = default) { var itemsSequence = DOTween.Sequence(); foreach (var item in _items) { // Calculate the item destination position. var destinationPosition = item.GetWorldPosition() + Vector3.right; _ = itemsSequence .Join(item.Transform.DOMove(destinationPosition, SlideDuration)) // Smoothly move the item. .Join(item.SpriteRenderer.DOFade(0, FadeDuration)); // Smoothly hide the item. } await itemsSequence.SetEase(Ease.Flash).WithCancellation(cancellationToken); } }Then create a class ItemsSlideInJob. public class ItemsSlideInJob : Job { private const float FadeDuration = 0.15f; private const float SlideDuration = 0.2f; private readonly IEnumerable _items; public ItemsSlideInJob(IEnumerable items, int executionOrder = 0) : base(executionOrder) { _items = items; // Items to animate. } public override async UniTask ExecuteAsync(CancellationToken cancellationToken = default) { var itemsSequence = DOTween.Sequence(); foreach (var item in _items) { // Save the item current position. var destinationPosition = item.GetWorldPosition(); // Move the item to the starting position. item.SetWorldPosition(destinationPosition + Vector3.left); // Reset the sprite alpha to zero. item.SpriteRenderer.SetAlpha(0); // Reset the item scale. item.SetScale(1); // Activate the item game object. item.Show(); _ = itemsSequence .Join(item.Transform.DOMove(destinationPosition, SlideDuration)) // Smoothly move the item. .Join(item.SpriteRenderer.DOFade(1, FadeDuration)); // Smoothly show the item. } await itemsSequence.SetEase(Ease.Flash).WithCancellation(cancellationToken); } }Jobs with the same executionOrder run in parallel. Otherwise, they run one after the other according to the executionOrder. Execution Order Demonstration SlideOutJob: 0 SlideInJob: 0 SlideOutJob: 0 SlideInJob: 1
 Create fill strategy
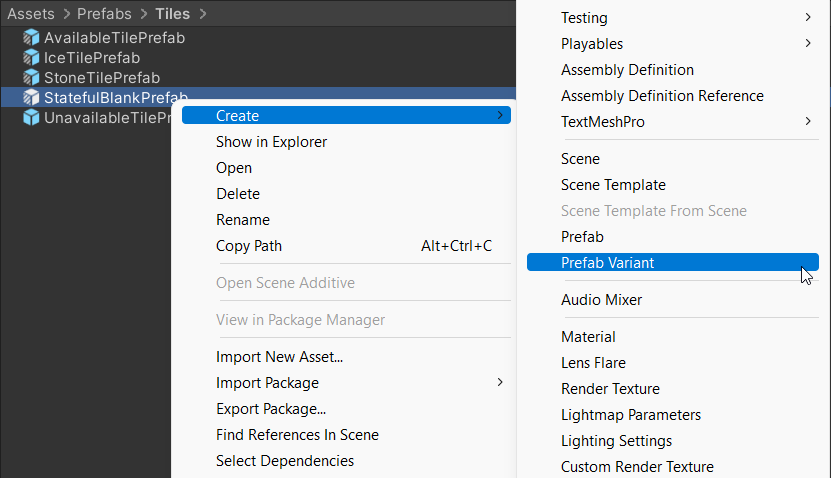
First of all, create a class SidewayFillStrategy and inherit from the IBoardFillStrategy. We'll need an IUnityGameBoardRenderer to transform grid positions to world positions and an IItemsPool to get the pre-created items from the pool. Let's pass them to the constructor. public class SidewayFillStrategy : IBoardFillStrategy { private readonly IItemsPool _itemsPool; private readonly IUnityGameBoardRenderer _gameBoardRenderer; public SidewayFillStrategy(IUnityGameBoardRenderer gameBoardRenderer, IItemsPool itemsPool) { _itemsPool = itemsPool; _gameBoardRenderer = gameBoardRenderer; } public string Name => "Sideway Fill Strategy"; public IEnumerable GetFillJobs(IGameBoard gameBoard) { throw new NotImplementedException(); } public IEnumerable GetSolveJobs(IGameBoard gameBoard, SolvedData solvedData) { throw new NotImplementedException(); } }Then let's implement the GetFillJobs method. This method is used to fill the playing field. public IEnumerable GetFillJobs(IGameBoard gameBoard) { // List of items to show. var itemsToShow = new List(); for (var rowIndex = 0; rowIndex public IEnumerable GetSolveJobs(IGameBoard gameBoard, SolvedData solvedData) { // List of items to hide. var itemsToHide = new List(); // List of items to show. var itemsToShow = new List(); // Iterate through the solved items. // Get unique and only movable items. foreach (var solvedGridSlot in solvedData.GetUniqueSolvedGridSlots(true)) { // Get a new item from the pool. var newItem = _itemsPool.GetItem(); // Get the current item of the grid slot. var currentItem = solvedGridSlot.Item; // Set the position of the new item. newItem.SetWorldPosition(currentItem.GetWorldPosition()); // Set the new item to the grid slot. solvedGridSlot.SetItem(newItem); // Add the current item to the list to hide. itemsToHide.Add(currentItem); // Add the new item to the list to show. itemsToShow.Add(newItem); // Return the current item to the pool. _itemsPool.ReturnItem(currentItem); } // Iterate through the special items (can be empty). // Get all special items except occupied. foreach (var specialItemGridSlot in solvedData.GetSpecialItemGridSlots(true)) { var item = _itemsPool.GetItem(); item.SetWorldPosition(_gameBoardRenderer.GetWorldPosition(specialItemGridSlot.GridPosition)); specialItemGridSlot.SetItem(item); itemsToShow.Add(item); } // Create jobs to hide and show items using the animations we created above. return new IJob[] { new ItemsSlideOutJob(itemsToHide), new ItemsSlideInJob(itemsToShow) }; }Note: The SolvedSequences & SpecialItemGridSlots can contain overlapping items. Once the SidewayFillStrategy is implemented. Register it in the AppContext class. public class AppContext : MonoBehaviour, IAppContext { ... private IBoardFillStrategy[] GetBoardFillStrategies(IUnityGameBoardRenderer gameBoardRenderer, IItemsPool itemsPool) { return new IBoardFillStrategy[] { ... new SidewayFillStrategy(gameBoardRenderer, itemsPool) }; } ... } Video Demonstration ItemsSlideFillStrategy.mp4 Create level goalLet's say we want to add a goal to collect a certain number of specific items. First of all, create a class CollectItems and inherit from the LevelGoal. public class CollectItems : LevelGoal { private readonly int _contentId; private readonly int _itemsCount; private int _collectedItemsCount; public CollectItems(int contentId, int itemsCount) { _contentId = contentId; _itemsCount = itemsCount; } public override void OnSequencesSolved(SolvedData solvedData) { // Get unique and only movable items. foreach (var solvedGridSlot in solvedData.GetUniqueSolvedGridSlots(true)) { if (solvedGridSlot.Item.ContentId == _contentId) { _collectedItemsCount++; } } if (_collectedItemsCount >= _itemsCount) { MarkAchieved(); } } }Once the level goal is implemented. Don't forget to register it in the LevelGoalsProvider. public class LevelGoalsProvider : ILevelGoalsProvider { public LevelGoal[] GetLevelGoals(int level, IGameBoard gameBoard) { return new LevelGoal[] { ... new CollectItems(0, 25) }; } } Create sequence detectorLet's implement a new sequence detector to detect square shapes. Create a class SquareShapeDetector and inherit from the ISequenceDetector. First of all, we have to declare an array of lookup directions. public class SquareShapeDetector : ISequenceDetector { private readonly GridPosition[][] _squareLookupDirections; public SquareShapeDetector() { _squareLookupDirections = new[] { new[] { GridPosition.Up, GridPosition.Left, GridPosition.Up + GridPosition.Left }, new[] { GridPosition.Up, GridPosition.Right, GridPosition.Up + GridPosition.Right }, new[] { GridPosition.Down, GridPosition.Left, GridPosition.Down + GridPosition.Left }, new[] { GridPosition.Down, GridPosition.Right, GridPosition.Down + GridPosition.Right }, }; } public ItemSequence GetSequence(IGameBoard gameBoard, GridPosition gridPosition) { throw new NotImplementedException(); } }Then let's implement the GetSequence method. public ItemSequence GetSequence(IGameBoard gameBoard, GridPosition gridPosition) { var sampleGridSlot = gameBoard[gridPosition]; var resultGridSlots = new List(4); foreach (var lookupDirections in _squareLookupDirections) { foreach (var lookupDirection in lookupDirections) { var lookupPosition = gridPosition + lookupDirection; if (gameBoard.IsPositionOnBoard(lookupPosition) == false) { break; } var lookupGridSlot = gameBoard[lookupPosition]; if (lookupGridSlot.HasItem == false) { break; } if (lookupGridSlot.Item.ContentId == sampleGridSlot.Item.ContentId) { resultGridSlots.Add(lookupGridSlot); } } if (resultGridSlots.Count == 3) { resultGridSlots.Add(sampleGridSlot); break; } resultGridSlots.Clear(); } return resultGridSlots.Count > 0 ? new ItemSequence(GetType(), resultGridSlots) : null; }Finally, add the SquareShapeDetector to the sequence detector list in the AppContext class. public class AppContext : MonoBehaviour, IAppContext { ... private ISequenceDetector[] GetSequenceDetectors() { return new ISequenceDetector[] { ... new SquareShapeDetector() }; } ... } Create special itemLet's create a stone item that is only destroyed when a match happens in one of the neighbour tiles. Add a Stone value to the TileGroup enum. public enum TileGroup { Unavailable = 0, Available = 1, Ice = 2, Stone = 3 }Create a class StoneState and inherit from the StatefulGridTile. public class StoneState : StatefulGridTile { private bool _isLocked = true; private bool _canContainItem; private int _group = (int) TileGroup.Stone; // Defines the tile group id. public override int GroupId => _group; // Prevents the block from move. public override bool IsLocked => _isLocked; // Prevents the item creation. public override bool CanContainItem => _canContainItem; // Occurs when all block states have completed. protected override void OnComplete() { _isLocked = false; _canContainItem = true; _group = (int) TileGroup.Available; } // Occurs when the block state is reset. protected override void OnReset() { _isLocked = true; _canContainItem = false; _group = (int) TileGroup.Stone; } }To respond to any changes in one of the neighbour tiles, we have to implement an ISpecialItemDetector interface. Create a StoneItemDetector class and inherit from the ISpecialItemDetector. public class StoneItemDetector : ISpecialItemDetector { private readonly GridPosition[] _lookupDirections; public StoneItemDetector() { _lookupDirections = new[] { GridPosition.Up, GridPosition.Down, GridPosition.Left, GridPosition.Right }; } public IEnumerable GetSpecialItemGridSlots(IGameBoard gameBoard, IUnityGridSlot gridSlot) { if (gridSlot.IsMovable == false) { yield break; } foreach (var lookupDirection in _lookupDirections) { var lookupPosition = gridSlot.GridPosition + lookupDirection; if (gameBoard.IsPositionOnGrid(lookupPosition) == false) { continue; } var lookupGridSlot = gameBoard[lookupPosition]; if (lookupGridSlot.State.GroupId == (int) TileGroup.Stone) { yield return lookupGridSlot; } } } }Once the StoneItemDetector is implemented. Register it in the AppContext class. public class AppContext : MonoBehaviour, IAppContext { ... private ISpecialItemDetector[] GetSpecialItemDetectors() { return new ISpecialItemDetector[] { ... new StoneItemDetector() }; } ... }Next, move on to setting up the scene and prefabs. First of all, add a block state sprites to the TilesSpriteAtlas and create a StoneTilePrefab prefab varian from the StatefulBlankPrefab. Prefab Variant Creation
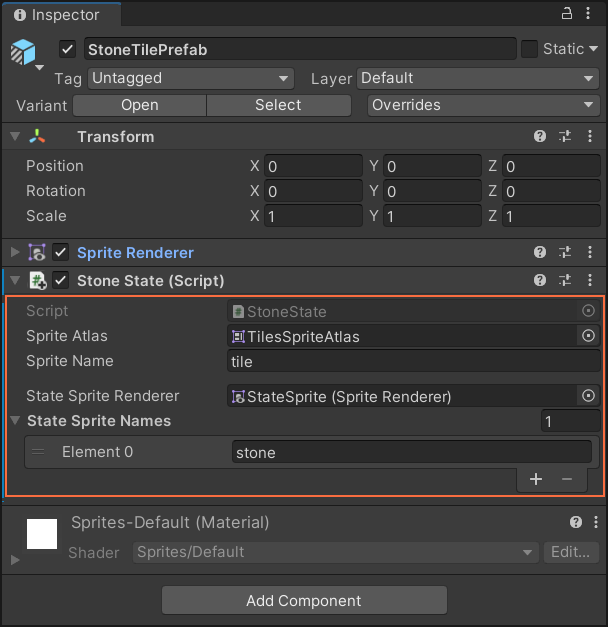
Configure the StoneTilePrefab by adding the StoneState script to it and filling in a State Sprite Names list.
Note: You can create more than one visual state for a block by adding more state sprites. Finally, select a GameBoard object in the scene and add the StoneTilePrefab to a GridTiles list of the UnityGameBoardRenderer script. Video Demonstration StoneBlockGameplay.mp4 📑 ContributingYou may contribute in several ways like creating new features, fixing bugs or improving documentation and examples. DiscussionsUse discussions to have conversations and post answers without opening issues. Discussions is a place to: Share ideas Ask questions Engage with other community members Report a bugIf you find a bug in the source code, please create bug report. Please browse existing issues to see whether a bug has previously been reported. Request a featureIf you have an idea, or you're missing a capability that would make development easier, please submit feature request. If a similar feature request already exists, don't forget to leave a "+1" or add additional information, such as your thoughts and vision about the feature. Show your supportGive a ⭐ if this project helped you! Usage is provided under the MIT License. |

【本文地址】